
Opening oysters at home can seem challenging, but with the proper tools and a little practice, it's a skill anyone can master. This guide provides safe and efficient instructions for shucking oysters, so you can enjoy a fresh batch from your local market or online delivery with confidence.
What Tools Do You Need to Shuck Oysters?
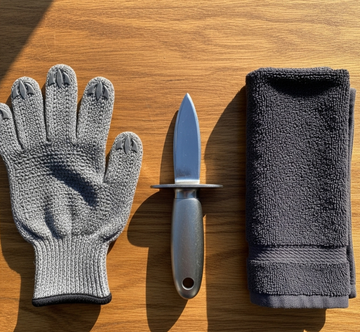
Before you begin, gather the right equipment to make the process safe and simple.
-
Oyster Knife: You will need a sturdy knife designed specifically for opening oysters.
-
Cut-Resistant Gloves: These are essential for protecting your hands from the sharp shells and potential slips.
-
Towel: A towel helps you hold the oyster steady and provides an extra layer of protection.
-
Bowl: Use a bowl to catch the opened oysters and their natural liquid, known as oyster liquor.
How to Shuck an Oyster: Step-by-Step Instructions
Follow these steps for a clean and safe shucking experience.
Step 1: Prepare Your Workspace
First, set up a clean, flat surface for your work area. Place a towel on the surface to keep the oyster from slipping as you work.
Step 2: Inspect the Oysters
Before shucking, ensure your oysters are tightly closed. You should discard any oysters that are open or have a foul smell, as this indicates they may be spoiled. It is also important to wash the oysters to remove any dirt or debris from the shells.
Step 3: Insert the Knife and Open the Shell
-
Hold the oyster properly: Place the oyster on the towel with its flat side facing up and the pointed hinge toward you. Firmly hold it using your gloved hand.
-
Insert the knife tip: Gently push the tip of the oyster knife into the hinge. Wiggle it slightly until you feel it slide into the seam.
-
Twist to pop the hinge: Once the knife is secure in the hinge, twist it to pry the shell open. Be careful not to spill the flavorful oyster liquor inside.
Step 4: Release the Oyster
-
Cut the top muscle: Slide your knife along the inside of the top shell to sever the adductor muscle that holds the oyster closed. Remove and discard the top shell.
-
Cut the bottom muscle: Gently slide the knife underneath the oyster meat to release it from the bottom shell. Try to keep the oyster level to preserve the liquor.
-
Check for fragments: Inspect the oyster for any pieces of shell and carefully remove them.
Step 5: Serve and Enjoy
Place the opened oysters on a tray of ice or in a bowl. For a classic presentation, serve them with accompaniments like lemon wedges, mignonette sauce, or hot sauce.
Don't Want to Shuck? 3 Easy Alternatives
If shucking by hand seems too intimidating, there are other simple methods to open oysters.
-
Steaming: Place oysters in a pot with a little water, cover, and steam for a few minutes until the shells open on their own. This method is quick and requires minimal effort.
-
Grilling: Heat a grill to medium-high and place the oysters directly on the grates. Close the lid and cook for 5-7 minutes until the shells pop open. Grilling also adds a pleasant smoky flavor.
-
Cryo Shucking: For a unique approach, you can pour liquid nitrogen over the oysters. The extreme cold causes the shells to crack open instantly. While more costly, it is an effective way to open oysters without manual shucking.
Frequently Asked Questions (FAQ)
Can I use a regular kitchen knife to open oysters?
No, you should never use a regular kitchen knife. They are not sturdy enough and can increase the risk of injury. Always use a proper oyster knife.
How do I know if an oyster is bad?
A fresh oyster should be tightly closed. If the oyster is already open or has a foul odor, it may be spoiled and should be discarded.
What if I'm not good at shucking at first?
Don't be discouraged if it takes a few tries to get it right. With practice, your technique will improve.
